I Built a 3D-Printed Newborn Diaper Logger Instead of Getting More Sleep
We recently had our first child—a major life change, to say the least. If you've been through this, you know that in the beginning, every nurse and doctor seems obsessed with one question: How many wet and dirty diapers has your child had in the last 24 hours?
It turns out there are very good reasons for this obsession. For breastfed babies, it's one of the primary ways to know if they're eating enough and staying hydrated. So, we needed to collect data. The question was, how?
At first, I created a simple database in Notion. The PPF (Pee, Poop, and Feed) Tracker was born. It did the job, providing plenty of data to reassure us that the baby was doing well. But with well over eight diaper changes a day, pulling out our phones while juggling a baby for every log got old quickly. Our discipline slipped, resulting in unreliable data. We had to fall back on our sleep-deprived memories, which weren't reliable at all.
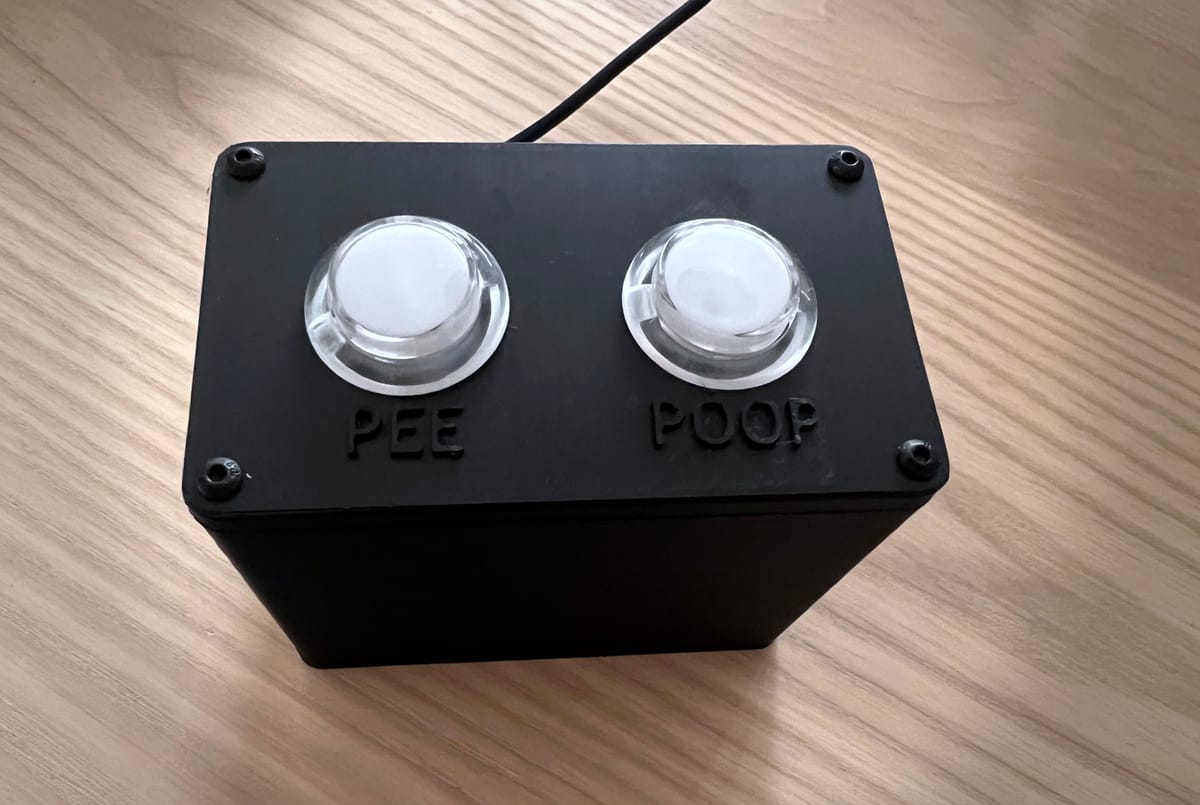
Thankfully, I had some electronic components lying around, my trusted 3D printer on hand, and some free time while the baby napped. So, I spent a weekend designing and building a new device: a simple tracker with two big buttons, one for "wet" and one for "dirty," to log each event with a single click.
This device will likely only be useful for a few months. But hey, it was a fun project that kept me busy during parental leave. If you're interested, read on to see how I built it.
The Notion Database
The first and easiest component of the PPF tracker is the Notion database. I chose Notion because it was a tool we were already using throughout the pregnancy to capture and share information with my partner. While it worked perfectly for us, it's by no means the only option. You could easily replicate this setup using other tools like Google Sheets or Airtable. The key is simply to use a platform that allows you to store structured data and provides API access. Regardless of your choice, here is how I set up the database in Notion:
| Property | Notes |
|---|---|
| Event | Multi-select. Originally with: Pee, Poop and Feed as options. We later added “Vitamin D” that the baby needs to take every day. |
| Date & Time | The date and time of the event. I created an automation to fill this field with the current time when the page is created. |
| User | The user who logged the event. |
| Notes | This is the page title, you can open it to add/view more details if needed - we have not used that much. |
The only trick here is with the "Date & time" property. I wanted to be able to set the date automatically but also be able to easily modify it for cases where you realize 30 minutes later that you forgot to log the start of a feed. This is why I didn't use the built-in "Created time" property. Instead, I created a date property alongside the following automation rule:
When "Page Added"
Do "Set Date to Time Triggered"
The Physical Buttons
I'm a special kind of lazy—the kind that believes the only way to get reliable data from me is to make the collection of it near instantaneous and painless. Fumbling with our phones during a messy diaper change was far from either of these things. That's when I decided to create some physical buttons.
The Hardware
A quick inventory of what I had on hand yielded the following:
- A Raspberry Pi Zero W
- Two Arcade Buttons with built-in LEDs (and resistors)
- Some Dupont Cables and Connectors
- A Multimeter
Wiring Everything
The wiring is straightforward. The core of the setup is connecting the two buttons to the Raspberry Pi's GPIO (General-Purpose Input/Output) pins. Each button has a set of pins for the button press itself and another set to control the LED.
Here is a quick diagram of what we landed on :
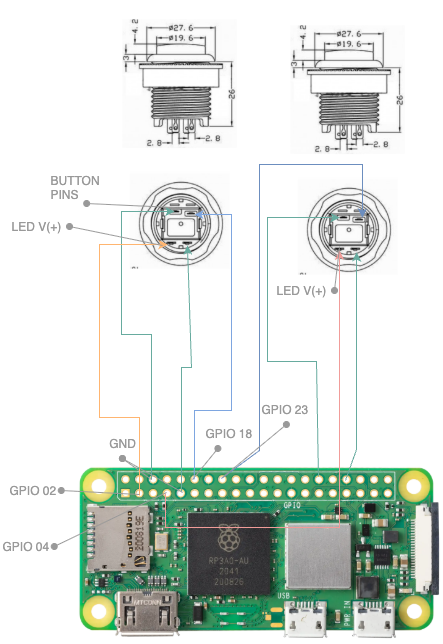
Thankfully, my Raspberry Pi came with pre-installed male header pins, which made the wiring very easy and didn't require any soldering. A quick note: while the specific GPIO pins I chose don't have to be these exact ones, they match the code you'll find below.
The only challenge I ran into was properly identifying the positive and negative pins for the LEDs. This required a multimeter and a little trial and error using these steps:
- Set your multimeter to the diode test mode (it looks like a small arrow with a line).
- Touch the red probe to one brass pin and the black probe to another.
- If the LED lights up, you have found the correct polarity: the pin with the red probe is the positive terminal (+), and the pin with the black probe is the negative terminal (-).
- If the LED does not light up, reverse the probes and try again.
- If it still doesn't light up, you're not on the correct pair of pins. Move the probes to another set of pins and repeat the process.
The Software
On the software side, the first step was to flash a micro SD card with Raspberry Pi OS Lite (64-bit). This is a command-line only version of the operating system, which is perfect because our project doesn't need a graphical interface. Since I have the Raspberry Pi Zero W, I connected it to my home Wi-Fi using the nmtui command-line tool. From there, I used SSH to work on the Pi remotely from my laptop, which made my life much easier.
The software is a simple script written in python (with the help of Gemini) that will run in a loop listening for button presses and triggering the relevant API call to the notion api to create the new entry in the database. If you do not have one yet, you will need to create an API key following these instructions : https://developers.notion.com/docs/create-a-notion-integration .
Before running the script, you'll need to install the following Python libraries in your virtual environment:
pip3 install notion-client
pip3 install RPi.GPIO
Here is the final working script. Remember to replace YOUR_NOTION_TOKEN_HERE with your actual Notion integration token and to verify the DATABASE_ID is correct.
import RPi.GPIO as GPIO
import time
import signal
import sys
from notion_client import Client
from datetime import datetime

# Define a signal handler for a clean exit
def signal_handler(sig, frame):
    print("\nExiting and cleaning up GPIO...")
    GPIO.cleanup()
    sys.exit(0)

# Register the signal handler for CTRL+C
signal.signal(signal.SIGINT, signal_handler)

# === Notion API Configuration ===
# Replace with your actual Notion API key and the database ID from your Notion URL
NOTION_TOKEN = "YOUR_NOTION_TOKEN_HERE"
DATABASE_ID = "223fxxxxxxa7"

notion = Client(auth=NOTION_TOKEN)

# === GPIO Pin Configuration ===
# Ensure a clean state for the pins
GPIO.cleanup()
GPIO.setmode(GPIO.BCM)

# Define GPIO pins for the buttons (BCM numbering)
PEE_BUTTON_PIN = 18
POOP_BUTTON_PIN = 23

# Define GPIO pins for the LEDs (BCM numbering)
PEE_LED_PIN = 2
POOP_LED_PIN = 4

# Set up button pins as inputs with internal pull-up resistors.
# Pin is HIGH by default, goes LOW when button is pressed.
GPIO.setup(PEE_BUTTON_PIN, GPIO.IN, pull_up_down=GPIO.PUD_UP)
GPIO.setup(POOP_BUTTON_PIN, GPIO.IN, pull_up_down=GPIO.PUD_UP)

# Set up LED pins as outputs
GPIO.setup(PEE_LED_PIN, GPIO.OUT)
GPIO.setup(POOP_LED_PIN, GPIO.OUT)

# === LED Control Functions ===
def turn_on_led(led_pin):
    """Turns on the specified LED."""
    GPIO.output(led_pin, GPIO.HIGH)

def turn_off_led(led_pin):
    """Turns off the specified LED."""
    GPIO.output(led_pin, GPIO.LOW)

# === Notion Functions ===
def log_to_notion(log_type, led_pin):
    """
    Creates a new page in the Notion database and provides LED feedback.
    :param log_type: The type of event to log ('Pee' or 'Poop').
    :param led_pin: The GPIO pin of the corresponding LED.
    """
    print(f"Attempting to log: {log_type}")
    turn_on_led(led_pin)

    try:
        current_time = datetime.now().isoformat()

        new_page_properties = {
            "Multi-select": {
                "multi_select": [
                    {
                        "name": log_type
                    }
                ]
            },
            "Name": {
                "title": [
                    {
                        "text": {
                            "content": f"{log_type} logged at {datetime.now().strftime('%Y-%m-%d %H:%M:%S')}"
                        }
                    }
                ]
            }
        }

        notion.pages.create(
            parent={"database_id": DATABASE_ID},
            properties=new_page_properties
        )
        print(f"Successfully logged: {log_type}")
        turn_off_led(led_pin)
        time.sleep(0.1)
        turn_on_led(led_pin)
        time.sleep(0.1)
        turn_off_led(led_pin)

    except Exception as e:
        print(f"Error logging to Notion: {e}")
        for _ in range(3):
            turn_off_led(led_pin)
            time.sleep(0.2)
            turn_on_led(led_pin)
            time.sleep(0.2)
        turn_off_led(led_pin)

# === Main Loop ===
def main():
    print("Newborn logger is running. Press a button or CTRL+C to exit.")

    last_pee_state = GPIO.input(PEE_BUTTON_PIN)
    last_poop_state = GPIO.input(POOP_BUTTON_PIN)

    turn_off_led(PEE_LED_PIN)
    turn_off_led(POOP_LED_PIN)

    try:
        while True:
            current_pee_state = GPIO.input(PEE_BUTTON_PIN)
            current_poop_state = GPIO.input(POOP_BUTTON_PIN)

            if current_pee_state != last_pee_state and current_pee_state == GPIO.LOW:
                print("pee button pressed")
                log_to_notion("Pee", PEE_LED_PIN)
                time.sleep(0.5)

            if current_poop_state != last_poop_state and current_poop_state == GPIO.LOW:
                print("poop button pressed")
                log_to_notion("Poop", POOP_LED_PIN)
                time.sleep(0.5)

            last_pee_state = current_pee_state
            last_poop_state = current_poop_state

            time.sleep(0.01)

    except Exception as e:
        print(f"An error occurred: {e}")
        GPIO.cleanup()

if __name__ == "__main__":
    main()
The final touch was to make sure the script would automatically start whenever the Raspberry Pi is rebooted. This is a crucial step for a reliable IoT device. I used a Cron job to handle this.
1- Open the Crontab with :
sudo crontab -e2- Add the following line to the file :
@reboot /Path-to-python/ppf-logger/env/bin/python3 /path-to-script/ppf-logger/newborn-logger.py > /path-to-logs/ppf-logger/cron.log 2>&1The Case
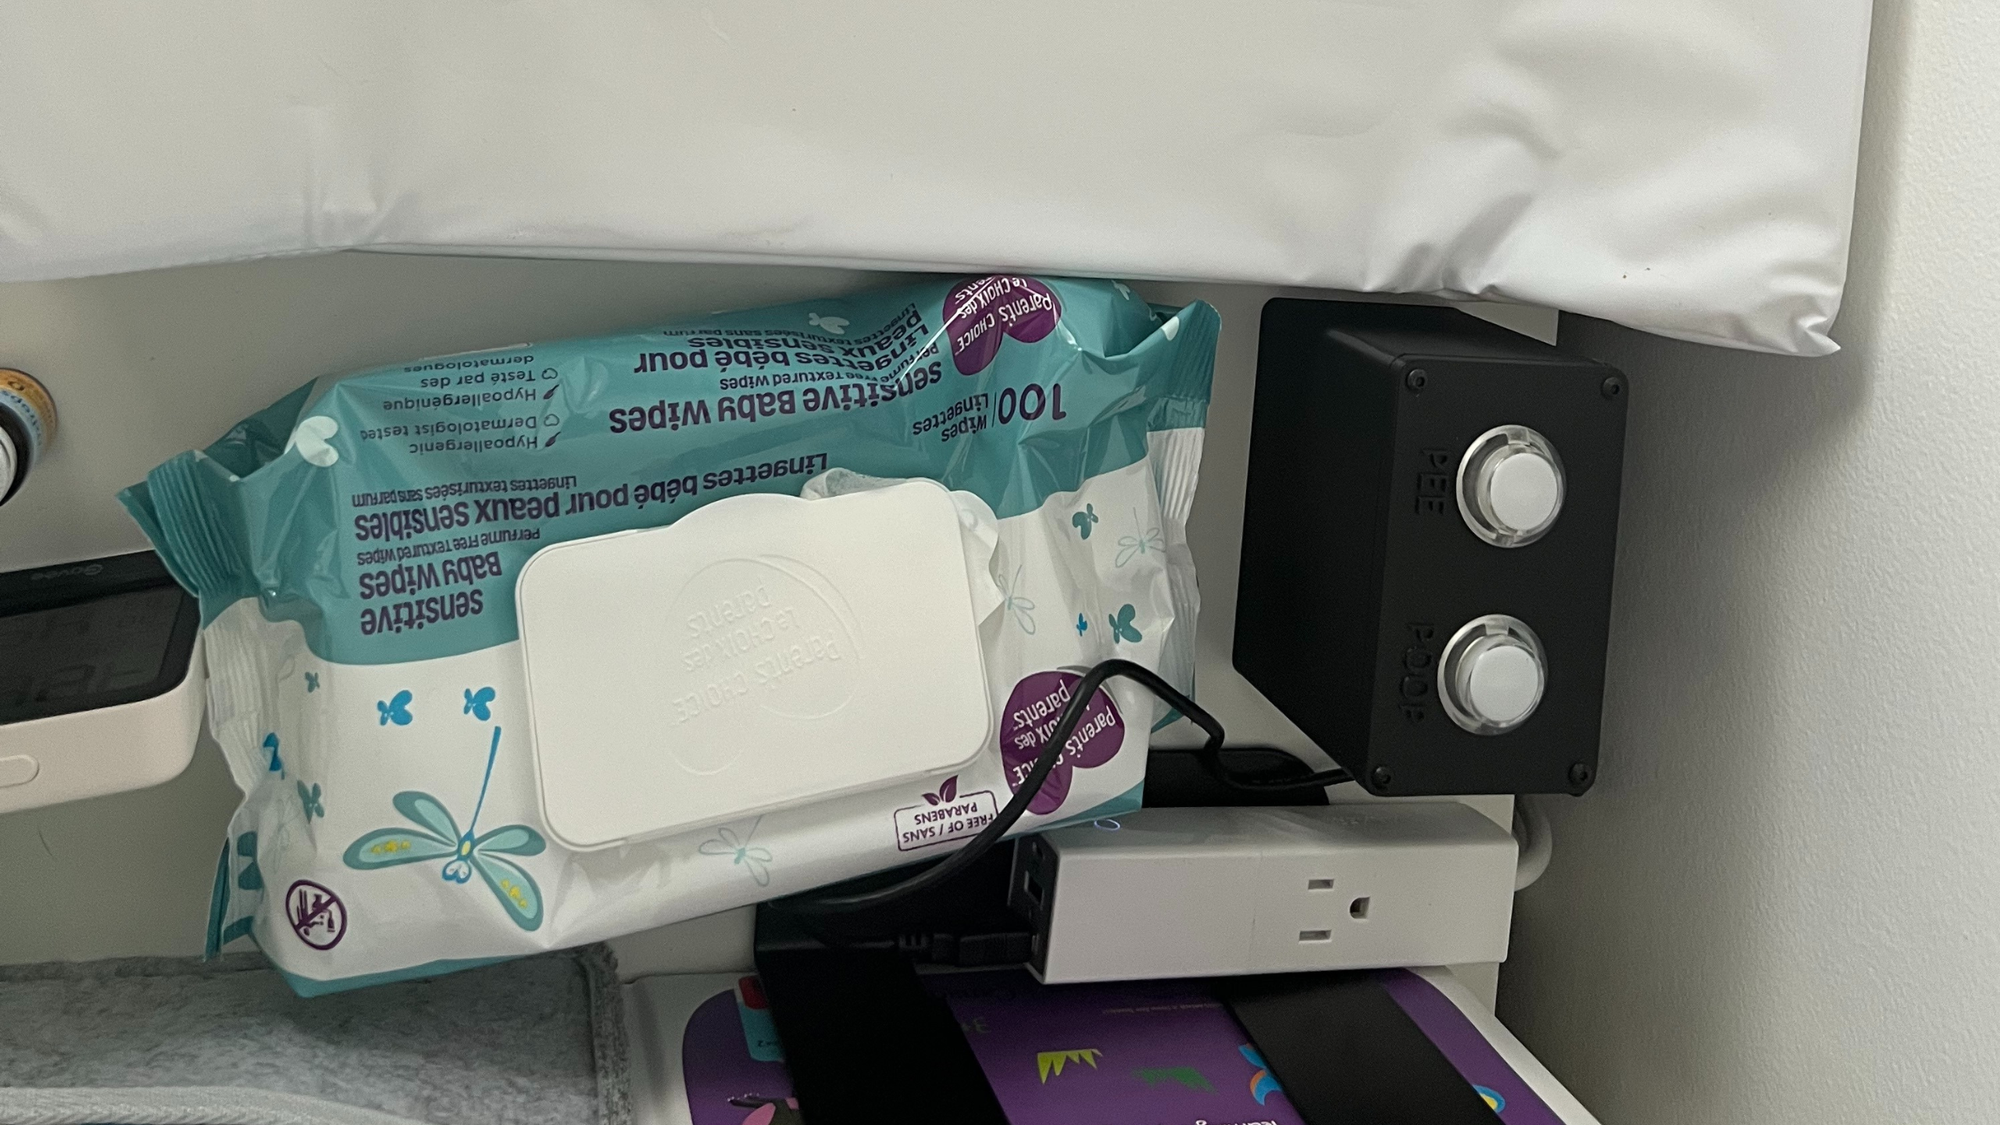
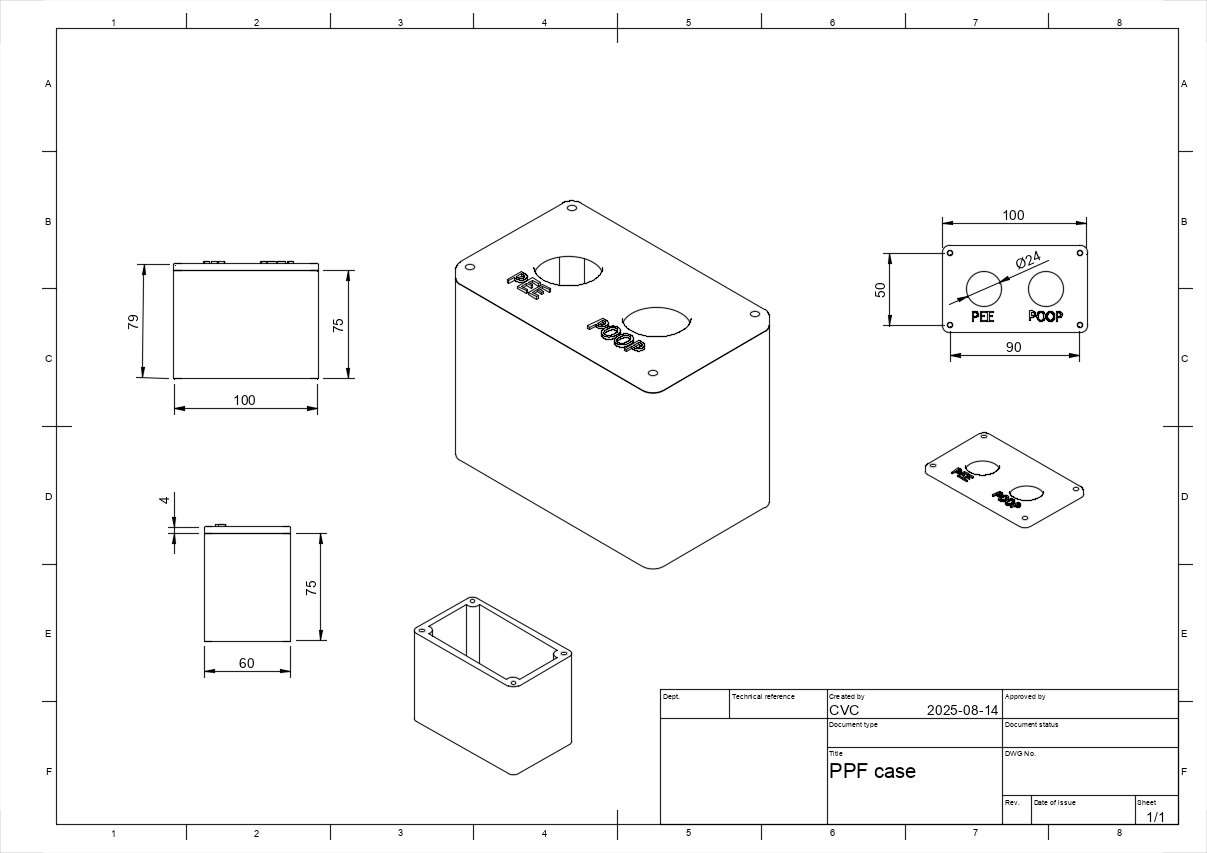
I wasn't ready to commit to 3D printing a custom enclosure until I was sure the concept worked and we'd actually use it. So, our first iteration was a crude but surprisingly functional cardboard box. It was ugly, but it proved the core idea.

Once we had some use out of the prototype and confirmed the system was a success, I designed a quick and simple box in Fusion 360 with a smaller, more polished footprint. A few hours of 3D printing later and the final product was in place.
The Verdict: Does It Get Used?
I'm not the most artsy or creative person, but I do really enjoy the satisfaction of building something functional. The biggest success factor for me when I build a project is whether it becomes a genuinely useful part of our daily lives.
A few weeks in, I'm happy to report that we consistently use it. The physical buttons have become a helpful part of our diaper-changing routine, and we now have a reliable, stress-free way to log our baby's data. Mission accomplished.